 Tuning With A Vacuum Gauge Tuning With A Vacuum Gauge
You might be asking yourself; What is a
vacuum gauge, engine vacuum, and how can this article help me? Good
questions for someone that does not understand how their internal
combustion engine functions.
Your engine is nothing more than an air
pump. This air pump just happens to burn a fuel that allows it to make
torque and power. The faster you can get the air/fuel in and out of the
engine the more torque you will make. The more volume of air/fuel you
get through your engine, the more horsepower you will make.
As the engine spins and the pistons move
down each cylinder they create a vacuum signal. It is this vacuum
signal that draws more air into the engine. In a carbureted application
this will also draw more fuel into the engine. Modern
computer-controlled fuel injected engines use sensors to measure engine
vacuum and/or airflow that provide information for the computer to
make complex calculations as to the fuel and timing curve the engine
requires.
What is important to understand is that
the higher the vacuum signal, the more efficient the engine is going to
be. This counts for every given RPM and load level the engine sees.
Using a medical analogy, you could compare your engine's vacuum
efficiency to that of your lungs. If your lungs are strong and efficient
you are more of an athletic nature. Nimble on your feat, in better
health, etc. Yet, if you're a chain smoker or overweight you are
most likely going to be out of breath at even the slightest exertion of
energy above your normal routine.
Engine vacuum is affected by how the
engine is built, its size, and intended use. Larger cams, carburetors,
cylinder heads, basically anything to increase air volume will
negatively affect air speed and the vacuum signal, at least at lower
engine speeds.
|
Reading the Vacuum Gauge:
Many racers and engine tuners (I get caught myself
sometimes) have opted for state-of-the-art diagnostic equipment but have
forgotten one of the simplest, as well as most accurate tuning tools
... the vacuum gauge.
Of course if your engine is barely able to sustain 2"
Hg vacuum at idle, it will be hard to tune using this method, but it is
still useful in diagnostics of some problems. If you use a quality large
faced vacuum gauge, with some experience you can effectively tune your
race car's fuel and timing systems. This is a starting point, we all
know that dozens of passes and laps will more than likely be required to
verify tuning adjustments and compensate for variations.
- Vacuum Gauge
-
Screw Driver
-
Vacuum "tee"
-
Carb Spray
Optional Tools:
First, A Few Basics:
-
Connection of the gauge is made to a simple "manifold" vacuum source. "This must NOT be from a ported vacuum source (a source that pulls vacuum from above the throttle blades) which rises as RPM increases".
In most cases your manifold vacuum source will be a direct
manifold fitting, or in some cases you can use the PCV port (larger
port on the carb) on a typical carb.
-
NOTE:
Connection to EFI (fuel injected) applications is best done "Tee'd" into
the source line. If you are not careful, disconnecting a particular
line can affect the idle speed and interrupt information that the ECM
needs to see. For this reason it is best to tee into your vacuum source
for the gauge connection.
-
You must have the timing "Pre-Set", or at least do all ignition settings "Before" any carburetor adjustments.
-
After each adjustment is made, you MUST RESET your
idle speed RPM setting. You do this to have a standard or baseline to
compare against.
-
Small adjustments are best, and in fact "optimum"
carb settings on the vacuum gauge (highest reading) is usually richer
than it needs to be. In other words, after the highest reading is
reached, the best setting (depending on engine) is to set mixture screws
back "lean" approximately 1/16 to 1/4 turn.
Proper Carb Adjusting Procedure:
With the above items taken into consideration, the
first thing you do with the gauge connected is to lean one of the
primary mixture screws (those on the front or primary venturis if
using a 4-Barrel carburetor) until the gauge as well as the engine
begins to shudder.
NOTE: With a
properly jetted carburetor, turning either of the mixture screws all the
way lean, should kill the engine. If not, you're too rich! This may
require re-jetting, or drilling the primary butterflies to add more idle
air. Many of the newer "race" carbs allow you to change idle air bleeds
to fix this.
If you know the jetting is
close, or even if you are not sure, you may need to remove the
carburetor and see if the emulsion slots are exposed at idle. These are
the small vertical slots at the lower portion of venturi, just above the
high side of the throttle blades. If these are exposed at idle (below
the throttle blade), additonal fuel will be pulled into the engine
causing a rich condition. To compensate you need to lower the idle screw
position to cover the slots. Now, after closing the throttle blades you
may find the engine needs more air. One way to solve this is by
drilling a small hole in each of the primary throttle blades. The
holes could be as small as 1/16" or as large as 1/8". Much more than
that is telling you that there are problems elsewhere.
You now bring the screw back towards rich, watching the gauge. (I'm
not being specific as to "in or out" movement of the mixture adjustment
for there are a few carbs that are actually "In" for rich instead of
the standard "Race style" Holley that is "Out" for richening the
mixture) As the gauge climbs, you will stop adjustment when the gauge
reaches it's highest reading. Now perform the same procedure for
the other mixture screw. You may have to repeat this process a few times
to get optimum results, plus it's worth the time an effort.
For carburetors with the 4-corner mixture screws, you have to spend
a bit more time setting these. You can also run the engine at a
"steady-state" RPM of say 2500 RPM to double-check your secondary
mixture screw settings. Do this with temperament! It takes time to
get used to what you are seeing as well as if it is actually helping.
Each engine will behave differently.
What Does The Above Tell You?
Reading the vacuum gauge correctly can help you find errors in:
-
Incorrect Jetting
-
Vacuum Leak
-
Leaking Power Valve
-
Misfires
-
Leaking Component Diaphragms (distributor vacuum canister, EGR Valve, etc)
-
Internal engine problems (valve adjustment, burnt valves, head gasket condition)
-
Clogged exhaust system (catalytic converters, failing mufflers)
When I was younger, I was taught to effectively tune
an engine with just the vacuum gauge and some track (or
driving) time. Not even a timing light (which can be scary)! Once
the education and practice is there, it is a very effective technique.
It takes some patience, but the knowledge of how your engine behaves to
tuning changes is worth it. The typical screw up will be that at first
you will set the engine with too much timing (more timing increases
vacuum). Correct vacuum adjustments will be less than the optimum high
reading. This is why using a timing light is mandatory. Otherwise, at
what you think is the best setting will cause substantial pre-ignition.
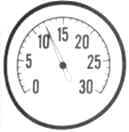
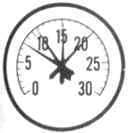
Detailed Vacuum gauge needle readings explained below:
| |
WHAT YOU SEE ON THE GAUGE
|
DESCRIPTION
|
|
|
Steady Needle
|
Normal reading (usually 15-22" Hg. in stock engines) Race engines vary "a lot" and in most cases will be considerably less.
|
|
|
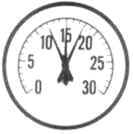
Intermittent Fluctuation at Idle
|
Ignition miss, sticking valves, lifter bleeding off (hydraulic), or just a BIG camshaft
|
|
|
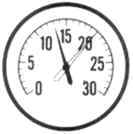
Low, Though Steady Reading
|
Late timing, low compression, sticking throttle valve,
carb or manifold vacuum leak (remember most race engines with a big cam
and a tight centerline and high overlap will be naturally low ... you
must decide your baseline vacuum reading)
|
|
|
Drifting Needle
|
Improper carb setting or minor vacuum leak
|
|
|
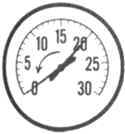
Fluctuating Needle as RPM Increases
|
Ignition miss, blown head gasket, leaking valve or weak or broken valve spring
|
|
|
Steady, but Needle Drops Regularly
|
Burnt valve or incorrect valve setting (too tight), "needle will fall when bad valve operates"
|
|
|
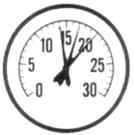
Gradual Drop at Idle
|
Clogged exhaust, excessive back pressure (extreme cases engine will die at idle)
|
|
|
Excessive Vibration that Steadies as RPM Increases
|
Worn valve guides
|
In Closing:
Now, of course all this info sounds really good, but
don't throw out your timing light, multi-meter and other required tools.
What the information above offers you is one more way to check for
proper tune of your engine, and also a few tricks to do some preliminary
testing of other components that typically require special tools and
equipment. The vacuum gauge does not replace the timing light,
multi-meter, exhaust system back pressure tester, leak down tester and
other tools, it only enhances them. No one likes to tear down an engine
to fix something broken, or spend excess hard-earned money on a trained
mechanic or tuner to find a problem.
Always remember to use the right tool for the job!

|